Mocking HTTP Web Services using Apache + CodeIgniter + Mac OS X
Sometimes as a mobile/web Developer you need to mock Web Services without spending too much time dealing with intensive configurations and permissions, let me show you my approach to resolve that problem.
1) Get MAMP.
2) Download CodeIgniter.
3) Rename the Codeigniter base directory to “services” and move it to the htdocs of your Apache server.
4) Now start the Apache Web server from the MAMP App and try typing http://localhost:8888/services, you should see something like this:
5) We want to create a WS that works like this:
Client Request:
POST http://localhost:8888/services/cars
Parameters:
platformVersion:”1.0″
Expected response:
http headers:
Access-Control-Allow-Origin: *
Content-Type: application/json
body:
{“errors”:null,
“response”:{
“cars”:[
{
“model”:”Passat”,
“maker”:”Volkswagen”
},
{
“model”:”ATS”,
“maker”:”Cadillac”
}
]
}
}
If the client tries to connect to the server using a HTTP GET instead of HTTP POST, you must throw an HTTP 401 with the next JSON:
{“errors”:”Unauthorized”, “response”:”null”}
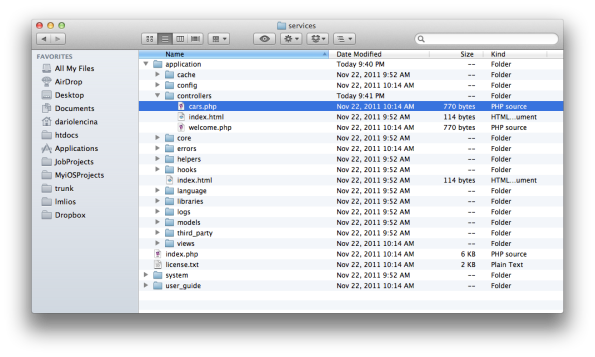
6) So we need to create a new controller with codeIgniter and call it “cars”:
 7) Open that file and change the controller name to Cars.
8) Now change the next in the index() function.
public function index()
{
echo (‘Test’);
}
9) Now open your favorite browser and try the next URL: http://localhost:8888/services/index.php/cars
You should see just a white screen with the word “Test”.
10) As you can notice, we need to get rid of that annoying “index.php” from the URL, in order to do that, we need to add an .htaccess file to our project.
Move to the ../htdocs/services directory and create a new file called “.htaccess” this file is used by the Apache web server for configuration purposes.
copy/paste the next Apache rule:
<IfModule mod_rewrite.c>
RewriteEngine On
#utf-8 o iso-8859-1
AddDefaultCharset utf-8
RewriteCond %{REQUEST_URI} ^system.*
RewriteRule ^(.*)$ /index.php?/$1 [L]RewriteCond %{REQUEST_URI} ^application.*
RewriteRule ^(.*)$ /index.php?/$1 [L]RewriteCond %{REQUEST_FILENAME} !-f
RewriteCond %{REQUEST_FILENAME} !-d
RewriteRule ^(.*)$ index.php?/$1 [L]</IfModule>
11) Now try http://localhost:8888/services/cars with your browser, it should work now.
12) Let’s go back to the cars.php file and modify the index() function:
public function index()
{
$json=null;
if($this->isPostRequst()){
if(!$this->isValidPlatform(“1.1”)){
$this->output->set_status_header(‘401′);
$json='{“errors”:”Invalid platform version”, “response”:”null”}’;
}else{
$this->output->set_header(“Content-Type: application/json”);
$this->output->set_header(“Access-Control-Allow-Origin: *”);
$json= ‘ {“errors”:null,
“response”:{
“cars”:[
{
“model”:”Passat”,
“maker”:”Volkswagen”
},
{
“model”:”ATS”,
“maker”:”Cadillac”
}]
}
}’;
}
}else{
$this->output->set_status_header(‘401′);
$json='{“errors”:”Unauthorized”, “response”:”null”}’;
}
$this->output->append_output($json);
}
13) Now add this methods to validate the platform number:
public function isValidPlatform($platformNumber){
$platform= $_POST[“platform”];
if($platformNumber== $platform){
return TRUE;
}
return FALSE;
}
14) This one is to resolve if the client is executing a HTTP POST:
public function isPostRequst(){
if ($_POST)
{
$isPost = TRUE;
}
else
{
$isPost = FALSE;
}
return $isPost;
}
15) Now try to execute the request from the browser, you should see this:
16) Now let’s open a terminal and execute this:
curl -o response.json -D headers.txt -d “platform=1.0” http://localhost:8888/services/cars
-o : this parameters defines the name of the output file.
-D: this parameter allows you to save the response headers to a file.
-d: (HTTP) Sends the specified data in a POST request to the HTTP server, in the same way that a browser does when a user has filled in an HTML form and presses the submit button. This will cause curl to pass the data to the server using the content-type application/x-www-form-urlencoded.
17) Execute “nano headers.txt” to see the response headers:
HTTP/1.1 200 OK
Date: Sun, 22 Jan 2012 04:37:15 GMT
Server: Apache/2.0.63 (Unix) PHP/5.3.2 DAV/2
X-Powered-By: PHP/5.3.2
Access-Control-Allow-Origin: *
Content-Length: 236
Content-Type: application/json
18) Now let’s try a “nano response.json” to analyze the HTTP response:
{“errors”:null,
“response”:{
“cars”:[
{
“model”:”Passat”,
“maker”:”Volkswagen”
},
{
“model”:”ATS”,
“maker”:”Cadillac”
}
]
}
}
19) As you can see, this is a very easy way to create simple HTTP Web Services and test your client applications.


Great walkthrough of setting this up! One note of caution to other copying and pasting sample code…The single and double-quotes need to be replaced with straight quotes.